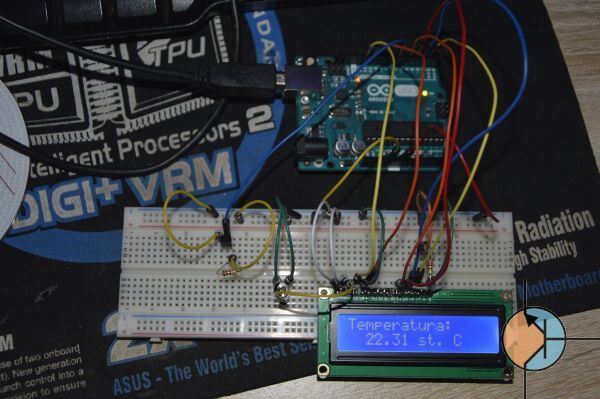
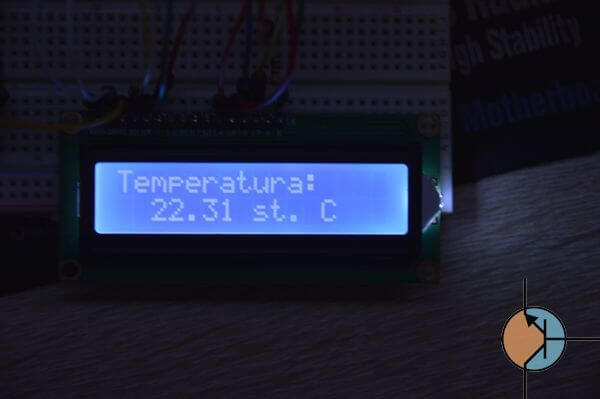
Układ prostego termometru prezentującego wynik na wyświetlaczu LCD. W moim przypadku do wykonania układu wykorzystałem Arduino UNO.
Do wykonania będą nam potrzebne następujące elementy:
– Arduino UNO (lub odpowiednik)
– układ DS18B20 (czujnik temperatury)
– wyświetlacz LCD np HD44780
– płytka stykowa, przewody
– biblioteka OneWire
– biblioteka LiquidCrystal
– rezystor 220Ω
– rezystor 1,2kΩ
– potencjometr 10kΩ
Schemat połączeń do Arduino:

Program:
#include < OneWire.h>

#include < LiquidCrystal.h>
// Connections:
// rs (LCD pin 4) to Arduino pin 12
// rw (LCD pin 5) to Arduino pin 11
// enable (LCD pin 6) to Arduino pin 10
// LCD pin 15 to Arduino pin 13
// LCD pins d4, d5, d6, d7 to Arduino pins 5, 4, 3, 2
LiquidCrystal lcd(12, 11, 5, 4, 3, 2);
OneWire ds(7); // ds18b20 pin #2 (middle pin) to Arduino pin 8
void setup(void) {
lcd.begin(16, 2);
}
byte i;
byte present = 0;
byte type_s;
byte data[12];
byte addr[8];
float celsius, fahrenheit;
int HighByte, LowByte, SignBit, Whole, Fract, TReading, Tc_100, FWhole;
///////
void loop(void) {
if ( !ds.search(addr)) {
ds.reset_search();
delay(250);
return;
}
if (OneWire::crc8(addr, 7) != addr[7]) {
return;
}
// the first ROM byte indicates which chip
switch (addr[0]) {
case 0x10:
type_s = 1;
break;
case 0x28:
type_s = 0;
break;
case 0x22:
type_s = 0;
break;
default:
return;
}
ds.reset();
ds.select(addr);
ds.write(0x44, 1); // start conversion, with parasite power on at the end
delay(750); // maybe 750ms is enough, maybe not
// we might do a ds.depower() here, but the reset will take care of it.
present = ds.reset();
ds.select(addr);
ds.write(0xBE); // Read Scratchpad
for ( i = 0; i < 9; i++) { // we need 9 bytes
data[i] = ds.read();
}
// Convert the data to actual temperature
// because the result is a 16 bit signed integer, it should
// be stored to an "int16_t" type, which is always 16 bits
// even when compiled on a 32 bit processor.
int16_t raw = (data[1] << 8) | data[0];
if (type_s) {
raw = raw << 3; // 9 bit resolution default
if (data[7] == 0x10) {
// "count remain" gives full 12 bit resolution
raw = (raw & 0xFFF0) + 12 - data[6];
}
} else {
byte cfg = (data[4] & 0x60);
// at lower res, the low bits are undefined, so let's zero them
if (cfg == 0x00) raw = raw & ~7; // 9 bit resolution, 93.75 ms
else if (cfg == 0x20) raw = raw & ~3; // 10 bit res, 187.5 ms
else if (cfg == 0x40) raw = raw & ~1; // 11 bit res, 375 ms
//// default is 12 bit resolution, 750 ms conversion time
}
celsius = (float)raw / 16.0;
fahrenheit = celsius * 1.8 + 32.0;
lcd.clear();
lcd.setCursor(0,0);
lcd.print("Temperatura: ");
lcd.setCursor(2,1);
if (SignBit) {
lcd.print("-");
}
lcd.print(celsius);
lcd.print(" st. C ");
delay(1000); //Czeka 1 sekund i odswierza
}
Kod źródłowy do pobrania:
Realny wygląd: